Saturday 31 December 2011

Updated: Les Petits Croquembouches

Sometimes I have a bit of an obsessive nature.  I wish I could easily apply this to my exercise regime, but unfortunately, the point of fixation is quite random.  When I was at the peak of my own personal fitness, I would run seven times a week (four times by myself, three times with the husband who was still a beginner) and do a couple of BodyCombat and BodyPump classes a week.  Okay, so I was no Paula Radcliffe, but for someone who comes from a 'large' family (small family, large people) it was really quite an achievement when the husband took some photos of me before a charity run and declared I was looking 'quite skeletal'.  In fact I still weighed 10st something, but when you've weighed 16st something, it's a fixation that's paid off.
Finished Petit Croquembouche

I think it's that obsessive fixation that's had me religiously keep this blog up for 97 consecutive days and making it to post 100 (I've double-blogged on three occasions).  If you've been following me on this journey, you will know that I've been fixated by certain books - notably Thomasina Miers' Easy Mexican Food and Dan Lepard's Short and Sweet.  My latest fixation is Lorraine Pascale.

Why the new fixation?  Well I got Home Cooking Made Easy for Christmas and it reminded me that I'd barely touched Baking Made Easy so now seemed like the ideal time to get on with it.  I have given myself until today to do the unhealthy recipe thing and from tomorrow, I'll be blogging about my attempt to improve the quality of my diet and shift a pound or 14 as I get back towards being a better runner in time for the Bath Half.

Les ingredients
Today's recipe of choice was Les Petits Croquembouches from Baking Made Easy.  You may remember I was going to do a Croquembouche for Boxing Day, but for one reason or another, it never happened.  So as a 'treat' to myself, I went for Pascale's 'Petit' version this evening as was just me and the husband dining, as is traditional.  

'Croques' have fascinated me since I was a child and had to find one to tick off in my Usbourne Spotters Guide to France.  While I was typing this, I just had to Google the availability of this little gem of a book.  Sadly, they don't publish them for countries any more (or at least as far as I can see) which is an absolute travesty.  Now how am I supposed to entertain my daughter when we go to France when she's older??

Anyway, back to Lorraine and her 'Croque'.  Like any good recipe, it is open to adaptation.  Pascale presents her 'Croques' by piling coffee-cream in the middle of the plate and just building the choux buns in a pyramid around this.  Maybe that's why she classes it as easy?  

Pre-baked choux buns
As far as I know, traditional 'Croques' are constructed from creme patisserie filled buns (I double checked myself on the Interweb, and Wikipedia  agrees, so it must be true).  With half a litre of double cream still in the fridge, I decided to fill mine with sweet vanilla whipped cream, decorate it traditionally with the spun caramel and then serve a little pot of chocolate sauce on the side for my uber fussy husband.  I do love the idea of the coffee cream, but want to start the New Year on a good footing (2011 hasn't been the easiest of years for us) so didn't want to do anything too way out!

Anyhow, the choux recipe and the spun sugar instructions are pretty simple and very well detailed.  'Croques' are notoriously hard to construct if you're doing the full on pyramid version as there's a lot of hand-dipping of individual choux buns in hot caramel which I'm sure would lead to burnt fingers and more than a few expletives.  

There is an alternative recipe on BBC Good Food where the tower is constructed using white chocolate as the 'glue' which might be something I'll try another day if I ever have the confidence to go for the full-on version.  This one has Limoncello cream filled buns.  Nom, nom, nom!!

My buns rose well but lost their puff when I took them out of the oven the first time.  Despite having had the full cooking time, I think they probably could've done with a little longer.  It may also be due to me having used spreadable butter because *shock horror* I'd run out of real butter so maybe the oil in the Lurpak had something to do with it.

Baked choux buns
I dried them out and piped them full of softly whipped vanilla cream which helped to make them look less flat again.  With an awful lot of cream to spare (Pascale doesn't fill hers with cream, I did and I still had a pile left over) I also piped cream in to the middle of my croque to hold it together rather than using the caramel to 'glue' them in to place.

I thought that the caramel would never ever get to the correct temperature.  It took about twenty minutes in all from mixing the sugar and water to it turning the required honeycomb colour.  Pascale doesn't offer thermometer temperatures, but I guessed I was after 'hard crack'.  My Heston thermometer didn't want to know about this - I don't think I had enough syrup in the pan for it to work as it says the probe must be submurged by at least 2cm and not touching the bottom of the pan. 

As for the recipe, I'm a bit disappointed with the picture in the book because I only got 14 and a half buns from my choux.  Maybe I made mine a little too big?  Pascale recommends circles 2cm x 3cm (that's a circle?  I'm sure circles were perfectly round when I was at school).  It's really hard to tell from the accompanying picture in the book just how big they are when they've puffed after cooking as there's nothing in the picture to give you any perspective so they could be miniscule or they could be the same size as mine.

Update @ 22:35 on New Year's Eve

No Sir Dickie, there are no mosquitoes in this caramel
Once it was the correct colour, I plunged it (as advised) into a saute pan of cold water to stop it cooking further and burning.  I did the twiddly thing, took a few pics and then had the husband ask me where my pudding was (seven puffs each wasn't enough - until he started eating it!).  That bit was pretty easy but then came the cleaning of the pan.  Pascale fails to mention that you'll be left with solid caramel in the bottom of your pan once you're done.  Nor does she tell you how to resolve this issue.  Thankfully a quick Google mentioned adding water to the pan and gently warming it.  The caramel cracked and came away in such huge amber-coloured chunks that I half expected to see Dickie Attenborough in my kitchen looking for pre-historic mosquitoes to turn into dinosaurs.  I then snuck outside and poured the rest of the hot caramel into the outside drain rather than plugging up my kitchen sink!
Close up of the top

All in all an entertaining day.  I didn't like that the choux buns were quite so soft and small (it made them hard to fill, but maybe that's why Pascale doesn't fill hers).  Personally I'd've liked them a little crispier, but my discerning (read fussy) husband really liked them.  I think if I was going for a full on three-foot high construction, then bigger and a bit crispier would be necessary or you'd need an awful lot of buns to get that kind of height.  I may try another choux recipe if I made it again.  Will definitely find an occasion for a really big tower and really want to try the Limoncello cream idea.


 Making the Choux

Pre-egg choux

First egg goes in 

Mix, mix, mix
Second egg goes in


Friday 30 December 2011

Quite Quick 'Apricot Danish Pastries'

They say that the camera never lies.  I know that this is not quite true.  Being married to a professional photographer has its advantages and disadvantages.  I've always hated having my picture taken because having been fat enough to rival Jabba the Hut in my teenage years, you don't want to be reminded which bits bulge that should bulge.  And even when I'm at my slimmest, I'm still not happy with my body - in fact when I was at my running peak (and I still weighed 10st something at this point) I thought I looked skeletal and gaunt - let's face it, women are never happy.
Breakfast: Danish, Berocca, Water and a Latte


When the hubby opened his studio, I was still in my post pregnant haze and so really not wanting to be in front of the camera at any cost.  I remember coming home from walking the dogs one morning to find him unpacking new lighting equipment in the lounge.  "Just sit there and let me test this" says he.  After a lot of protesting about being mud spattered and fat and ugly, I gave in.

A few hours later, he presented me with the results of the picture.  I was really chuffed.  I was looking quite good for someone still three stones over her ideal weight and who'd suffered many a sleepless night. Stupidly, I made this comment out loud.  "Well I slimmed down your face, rubbed out your wrinkles, edited out the bags under your eyes, whitened your teeth and eyes...." At that point, I walked away to have a little sob to myself.

Still at least when Abigail looks back at some of the pictures of her mum when she was young, she'll think her mum was a bit pretty.  In reality, I don't quite look much like my blog or Twitter pictures.  Unless I'm in flattering light.  I'm too old for that.

And unflattering camera light brings me nicely round to today's recipe.  When I took the pictures of the apricot Danish,  I couldn't quite find the right angle to photograph it from.  And when I did take the picture, the harsh light from the flash (it's just to miserable to get any good light in my kitchen this morning) showed up the need to grout between the tiles in my kitchen.  Ooops!  And I'm rubbish at Photoshop so I can't even edit them to make it look better.

The rustic 'I forgot to flour the worktop' look
I picked today's recipe because I had a little bit of left over pastry in my fridge from making sausage rolls.  It's from Lorraine Pascale's Home Cooking Made Easy which the husband bought me for Christmas.  I blogged early on about trying to make cherry Danish with puff pastry.  That recipe used some weird Philly-based cheese filling which was okay, but not really what I'd consider Danish filling.  My attempt at making actual Danish pastry the other day was a bit of a long-winded failure so Pascale's recipe seemed a good opportunity for another attempt to make something I could make time and again.  Simple and tasty without hours of labour.

The original recipe uses shop-bought fresh custard as the filling.  But as I didn't have any to hand and didn't want to buy a whole pot to just make two Danish (that's all the pastry I had), I thought I'd have a go at making proper creme patissiere instead.  It's something I've made once before when I was about ten, under the eagle-eyed instruction of my mother, the ex-pastry chef.  I think we made a strawberry flan.  But I'd have no idea how to make the pastry cream off the top of my head.

Creme patisserie
So I turned to t'Internet.  I know the Great British Bake Off book has a recipe for this, but I was too lazy to get the book off the book shelf at stupid o'clock in the morning.  Instead, I used a recipe from Joy of Baking.  As I was only making two pastries, I made one third of the recipe which was probably enough to make four apricot Danish.

I also put the custard under the apricots, rather than on top of them as Pascale suggested.  The pastry points wouldn't stay together on top of the apricots so I used a little blob of pastry from the trimmings to stick them all together and this survived the oven.

For a simple, non-faffy Danish recipe, this worked really well and I'd definitely make them again when I had guests.  I'd still love to master making the actual pastry myself, but it wouldn't be something I'd do every time as these are just as tasty as shop-bought and if I'm honest, most people (ie the husband) wouldn't appreciate the hours you spend labouring over home-made pastry if they taste just as good with shop-bought.

This is my own edited version of Pascale's recipe, hence calling it 'Quite Quick...' as hers are 'Really Quick....'

Makes 12

For the Danish

  • 1 x 375g packet of puff pastry
  • 1 quantity of creme patisserie (see below)
  • Plain flour for dusting (I forgot this and they stuck to the work top!)
  • 1 x 220g tin apricot halves in juice
  • 1 egg lightly beaten for the egg wash
  • Sugar for sprinkling


For the creme patisserie 


  • 300ml milk (full fat or semi-skimmed)
  • 1/2 vanilla bean, split lengthwise or 1 teaspoon pure vanilla extract or vanilla bean paste
  • 3 egg yolks
  • 50g granulated white sugar
  • 20g plain flour
  • 20g corn flour


  1. First, make the creme patissiere.  Mix the egg yolks and sugar in a heatproof bowl then stir in the flour and corn flour to form a thick paste.
  2. Heat the milk and vanilla pod (if using) in a medium saucepan until scalding.  Carefully remove the vanilla pod (if using) and scrape the seeds into the milk (this can be rinsed and added to a jar of sugar to make vanilla sugar).
  3. Pour the hot milk into the egg paste and whisk quickly to combine.
  4. Return the egg mixture to the saucepan and bring to the boil whisking constantly.  Once boiling, whisk for a further 45 seconds then remove from the heat and leave to cool.  If using vanilla extract or bean paste, stir this in now.
  5. Preheat the oven to 220C/gas 7.
  6. Roll the pastry out on a lightly floured work surface to a 30cmx30cm square.
  7. Cut the pastry into 7.5cm squares and make diagonal cuts form each corner to within 1cm of the middle (note in the picture, my windmills are not precisely measured and cut - it was too early to find a ruler!)
  8. Put a spoon of pastry cream into the centre and then top with an apricot half.
  9. Fold alternate corners of each cut section to the centre, brushing the tips with beaten egg.
  10. Refrigerate for 15 minutes or so until firm.
  11. Remove from the fridge, brush with egg wash and then sprinkle with sugar.
  12. Bake for 20-25 minutes or until firm, risen and golden brown.
  13. Remove from the oven and leave to cool.

Thursday 29 December 2011

Chocolate, Cranberry and Macadamia Brownies

I'm still on a thrifty drive, trying to use up Christmas leftovers rather than just erm...disposing of them.  Obviously I try to use everything up ordinarily and any meat based products that are past their best are usually well received by our two dogs.  But every year, I buy cranberry jelly.  Every year, the husband has one spoonful with his Christmas dinner.  Every year, I put the jar in the fridge with the intention of using it for something else.  Every June, I have a mass clear out of the fridge and discard it because the back of the jar says to only keep it for two weeks after opening.

Finished brownies - sorry for the poor lighting!
But this year, given the current challenge, I thought I'd do something different.  I had a little yesterday with my baked Camembert lunch.  I then leafed through several recipe books looking for something to do with it, but all the recipes wanted dry or fresh cranberries or just served the sauce on the side.

So back I went to BBC Good Food.  They're really good at recipes for recycling Christmas leftovers and they recommended a fab recipe for post-Christmas pie to me the other day which you can find here.  Would have loved to make this, but the husband doesn't like any meat-based pie that doesn't come from the chippy - classy!

A quick look at the rest of their post Christmas recipe collection turned up Cranberry and Macadamia Brownies.  Result.

Despite struggling to fit into my jeans and having not run for a week because of a nasty cold that's been kicking around, I had plans to make brownies today.  My hubby is a photographer and was doing a shoot for Miss Laura Mai, professional singer and one of our regular models tomorrow.  She (and lots of other people) say I make the best brownies ever and I promised her I'd make some next time she was in.  Sadly she crashed her car today (she's fine thankfully) but I'd just taken the brownies out of the oven when she texted to say she couldn't make the shoot so I'm being good and popping them into the freezer for the lucky guys I work with when I go back in the New Year.
Jewel red cranberry sauce going in

I did have a little taster when I cut out a piece to take a picture for the blog (the picture's rubbish because of the poor light in my kitchen this time of year) and the edge piece was lovely and soft, with the sharp taste of cranberry complementing the sweetness of the brownie.  I also loved the buttery crunch of the macadamias (my favourite nuts).    I don't often use nuts in my brownies for various reasons but really should experiment with nuts a bit more - pistachios being one nut I'd love to try out.  Once cut, the inner sections also had a very promising fudgy look to them.  Perfect.

The original recipe can be found here on the BBC Good Food website

I made a couple of modifications to the method based on my own brownie recipe.  It worked well for me.

Cuts into 16 (original recipe says 12)


  • 150g dark chocolate , broken into chunks
  • 200g butter
  • 200g soft brown sugar
  • 150g self-raising flour , sifted
  • 40g cocoa powder , sifted
  • 3 large eggs , beaten
  • 50g dried cranberries
  • 100g macadamia nuts
  • 60g cranberry sauce
  1. Heat the oven to 180C/ 160C fan/ gas 4 and line a 20cm x 20cm baking tin with baking parchment. Melt the dark chocolate with the butter in the microwave or in a heatproof bowl over just simmering water.  Leave to cool slightly.
  2. Using a mixer, whisk the eggs and sugar until thick and creamy and the raised beaters leave a trail on the surface for 3-4 seconds.  This may take anywhere between 3 -8 minutes so perserver.
  3. Fold the cooled chocolate into the eggy mousse and fold in using a spatula in a figure of eight motion.
  4. Fold in the flour and cocoa powder, again using the rubber spatula and a figure of eight motion until combined - take care to not overmix.
  5.  Stir through the dried cranberries and macadamia nuts, then swirl through the cranberry sauce.
  6. Pour into the tin and smooth the surface. Bake for 25 - 30 mins. Allow to cool before slicing.


Wednesday 28 December 2011

Camembert and roasted garlic

The night before Christmas, the husband informed me that the turkey was off.  Cue mild panic that we may be having beans on toast for lunch after all.  But on excavating the mountains of food I'd purchased (that subsequently went uneaten) it turned out to be the Camembert that I'd purchased to do Paul Hollywood's brioche wrapped Camembert - it should've been Brie, but Sainsburys were all out of whole one.

Said cheese then had to be wrapped in several plastic bags before being sealed into a Tupperware box because the smell offended the husband's sensitivities.  Of course, with all the other non-eating going on due to several unwell people, the cheese was forgotten until last night.  Hmmm...  What to do with it?  There would be no chance of the husband eating it and the eight-hour recipe that is the Silver Fox's baked Brie just seemed too much effort for one person so, having reorganised some of my most favoured cookbooks on to the book case in the lounge, I leafed through them seeking inspiration.

Lorraine Pascale's Baking Made Easy had the answer.  I remember her baking this one on her show, and thinking at the time that I didn't really consider shoving a cheese in a box in the oven to be baking.  But hey, I had cheese to eat so I might as well give it a go (and her deep fried Camembert from Home Cooking Made Easy seemed far too decadent).

I bought the book for a fiver when the Book People were at work but it's another one that's had little use.  Having leafed through it again, I will definitely make an effort to use it more over the remaining eight and a bit months of this blog.  I bought it for the recipe for Mojitos Genoise which looked amazing (and was then published in BBC Good Food anyway).   I've made the Oreo Brownies which went down a storm with the recipients and I'm pleased to see a recipe for mini Croquembouche which I will be making for me and the husband on New Year's Eve - because I've got half a litre of double cream to use up.

Mmmmm....cheese....
The recipe was really easy.  I know from researching other similar recipes that you need to make sure your cheese box is stapled rather than glued or it will fall apart in the oven (solve this issue by tying string around the middle).

I had planned to make a Pain d'Epi from Easy Home Cooking to go with it, but in the spirit of recycling, ate it with some of the crackers left over in the Christmas tin (there was only one missing - why on earth did I bother buying them).  But any crunchy bread-related things will do for dipping.

Do watch the oven temperature though because my honey burnt and made the top of the garlic burnt, however it was still really tasty and the flavours from the herbs with the honey made the roasted garlic beautifully sweet.  I must go and swig some mouthwash before I venture out again.

Recipe - Serves 2

  • 2 bulbs of garlic, unpeeled with the tops sliced off
  • 40g butter
  • 80ml extra virgin olive oil
  • Salt and freshly ground black pepper
  • 1 squidge of honey
  • 2 fresh rosemary sprigs
  • 3 bay leaves
  • 200-250g Camembert, plastic wrapping and lid removed but still in its wooden box at room temperature
  • 1 French baguette, ripped into 10cm pieces and sliced horizontally


  1. Preheat the oven to 200c
  2. Place the garlic cut side down in a large roasting tin.  Add the butter, oil, a pinch of salt, a couple of twists of black pepper, the honey, rosemary and bay leaves and bake in the oven for 40-45 mins.  After 30-35 mins put a large cross in the top of the Camembert and add it to the oven.  Add the French baguette to warm up too.
  3. Once the garlic is soft, the bread is extra crunchy and the cheese is all soft and gooey, remove from the oven.
  4. Serve everything on a big sharing plate.  Break off a piece of crusty bread, squeeze out the tender flesh of the garlic along with a healthy dose of cheese and smear it liberally over the bread.
  5. Serve with a chutney or relish and a good glass of red wine.

Tuesday 27 December 2011

Dan Lepard's Soft Vanilla Fudge

Unless you are hyper-organised and start writing your Christmas card/present list on January the 1st, chances are you've experienced the horror of a Christmas card landing on your doormat after the last posting date from someone who you haven't sent a card to.  Or you've received a gift from someone and you've not bought them one back.  For most people, it happens at least once or twice in a lifetime.  For me, it's happened several times in this one Christmas *blushes*

My lovely Grandma drummed into me that it's all about the giving, and not the receiving.  Which is why I give away so many home-baked goodies throughout the year and never get any in return (not bitter, honestly - just trying to underline to my husband why I do this).  So I was mildly disturbed by not having managed to get hold of the address of a friend who recently moved, slightly more disturbed that I asked someone for their new address and then promptly posted their birthday and Christmas card to their old address and in a mild state of stress come Christmas morning when I realised I'd forgotten to do the Thornton's run and not bought the usual box of chocolates for one of my aunties (who is really the wife of a cousin of my Grandma).  She'd enclosed a lovely crisp tenner in our card which I selflessly put into the child's money box as a way of assuaging some of my guilt.
My gift box of fudge, coconut ice and truffles

Since then, it's eaten away at me.  She's lives just over the road from my Grandad so it's not like it's difficult to get a present to her.  Hmmmm....  Then, whilst staring at the mountains of uneaten food and the jars-of-things-you-only-ever-buy-at-Christmas-and-have-only-had-one-spoonful-removed-from-them (cranberry sauce, Branston pickle, pickled onions, gherkins, maraschino cherries,mincemeat - half empty jar of home made stuff) and wondering what to do with it all, I remembered a recipe for mincemeat shortbread I'd recently happened across in one of the huge pile of books that I own.

Perfect.  Until I got up at stupid o'clock this morning to make the shortbread before the family departed and realised that I only had half a block of butter in the fridge.  How did that happen?  Every week, Ocado dutifully remind me via my favourites that I get through six blocks of butter - well I don't, but ever since I had a mad baking week and bought six blocks, it tells me I need six more, no matter how many times I change it to one.  Scuppered!

Not enough ingredients for the lovely Nutella and Sea Salt Fudge I wrote about the other day.  I had a little bit of Dan Lepard's Soft Raspberry Coconut Ice and a few of the Chocolate Mint Truffles still in the freezer.  Still not enough to fill a gift box.  So I decided that while I had a child-free half an hour (she was still sleeping) I'd give my new Heston Blumenthal sugar thermometer a whirl and make some Vanilla Fudge from Short and Sweet.

New Heston thermometer in action
I asked Santa for the thermometer months ago when it first came out, swayed by the 'easy to read' display with a rotatable head, the alarm when it reaches the correct temperature and the fact that it clipped to the pan easily.  The last thermometer that I owned shattered into a pan of fudge and because it had no clip, I'd burned my hand several times, trying to get it to stay in a position I could easily read so this one sounded like it was made for me.  However, I recently read some reviews on Amazon about it where people complained that it malfunctioned easily or fell apart after one or two uses.

I have mixed feelings about reviews on Amazon sometimes.  They're often helpful, but I also realise that people are more likely to write a bad review of something they had a bad experience with than write a review about something average that does the job it says it does.  I note from checking the reviews as I type that it currently has an average rating of one star...

How did I fare with it?  Well it was reasonably easy to operate - there are pre-programmed temperatures for all the common sugar temperatures (soft ball, hard ball....) and and it clipped easily to the pan and I could manouvere the head to where I could easily read it so no burnt fingers.  But when it hit 113c (I was after 115c for soft ball) the alarm went off and the temperature didn't rise any further.  Being paranoid that my fudge may burn, I finally removed it from the heat but it has ended up with a very pale creamy colour where I was expecting something a little more toffee-coloured.  Sadly there's no picture in Dan's book to show me what it should look like.  I'll have to try the recipe again some other time.
Finished fudge

However.  If you pop over to the blog by the lovely Ali of Hungry Squirrels fame, you can see that hers is the colour I think mine should have been.  I was really grateful for this blog post about the fudge as she had two 'learning attempts' before her final success.  All through making my fudge, I had her tips resounding around my head.  The most notable one was to '...watch like a hawk, stir like a Kenwood...'  Excellent advice and I have nothing to add to that.

The other issue I had was which tin to use.  Lepard suggests a loaf tin as he cuts his into cubes.  I wanted to do festive shapes (I'm such a copycat - you have to check out Ali's Fudge Scottie Dogs, they're ace!) so I put mine into a 20cm square tin.  It ended up being quite thin (to be expected) but the fudge is so sweet, it doesn't really matter any way.  I also had to bung it in the freezer once it was cool to get it to set firmly enough to cut and pack before my free delivery service (my Grandad) left to go back home.


I went for the double cream and glucose option as I have a half a litre of cream leftover from Christmas in my fridge (it was for the unmade Croquembouche/profiteroles).  Ali used evaporated milk.  Maybe that's what made the colour difference?  I feel more experimenting coming on...

  • 400g caster sugar
  • 150ml evaporated milk or double cream
  • 100ml whole or semi-skimmed milk
  • 75g unsalted butter
  • pinch of salt
  • seeds from ½ a vanilla pod or ½ tsp vanilla bean paste
  • 2 tsp of liquid glucose (if using double cream)


Equipment - sugar thermometer, parchment lined loaf tin

  1. Place the sugar, evaporated milk, milk, butter and salt in a heavy-bottomed saucepan.
  2. Using a wooden spoon, stir the mixture over a low heat until the sugar has dissolved, then bring to the boil, stirring constantly
  3. Reduce the heat to just under a boil and cook for about 8 minutes, stirring constantly to make sure the fudge doesn’t stick and burn.
  4. Once the temperature reaches 240°F, remove the pan from the heat, and leave until the temperature drops to 230°F.
  5. Add the seeds from the vanilla pod or vanilla bean paste, and beat with a wooden spoon for 8-10 mins again until the mixture is thick and creamy.
  6. Pour into the tin and leave until cool before cutting with a clean sharp knife, or with a cutter.
And as a sub-note, the mincemeat and almond shortbread is in Rachel Allen's Favourite Food For Friends.  Another book I've bought rather excitedly, read from cover to cover and never cooked anything from.  Because I have no friends.  *Sob* (okay that's not really true)

Monday 26 December 2011

Beef and Red Wine Pie Filling

I was going to make a croquembouche for dessert today.  I did my research, found my recipe, tweeted the lovely @Wotchers (Mary-Ann from the Great British Bake Off) for advice.  I then got given the GBBO book for Christmas and decided I'd use the recipe in there to create my masterpiece.

Dinner tonight was going to be a proper dinner party.  But I'd deluded myself that because we have guests, my husband might actually attempt to eat what was in front of him without being all whiney like a spoilt toddler.  School-girl error.  I picked something that was relatively low cost, not poultry based and not creamy as I wanted to do the choux buns for pudding.

Ingredients
I've mentioned before that he will generally only eat chicken and sausages.  Every so often, he'll eat a beefburger or if he's feeling radical, a lamb kebab (the mush-on-a-stick ones that you get from the supermarket in barbecue season).  Why on earth I thought I might be able to change this, I don't know.  And now having thrown my toys out of the pram and flounced upstairs to spill my woes on my blog, I'm feeling rather silly.  We've been together nearly eight years so I should know by now that he will do as he pleases.

We're trying to economise as he is running his own business and we've gone from being a two salary, no child household to a one salary household with child and astronomical business expenses to boot.  He recently (on my birthday!) visited a friend of his who lives in a smug, self-satisfied world of thrift.  They got to discussing how much each household spends on their weekly shop.  The friend - £60 for two adults and one child, allegedly including beer for three nights of the week.  Us - around £120.

I know a lot of people who would throw their hands up in horror at my weekly spend.  We get through a lot of fruit.  I include nappies in that figure and all the other household cleaning stuff (why do I spend so much on that and still live in a dump of a house??).  The child eats an awful lot of expensive fruit - I can't believe how expensive grapes are these days.  But a lot of it is squandered on me planning the food for the week and then when the husband says a couple of hours before dinner 'I don't want that', dashing off to Tesco Express to buy something else for him.  My freezer is positively groaning with stuff I've had to freeze that he decided he didn't want to eat that day.  And I rarely dare defrost anything just in case 'he doesn't feel like that today'  and it ends up in the bin.
That's not burnt (bottom right) it's the red wine reduction

Conversely, Mr Smug knows 40 days in advance what is for dinner on any given day because they have a planner.  How organised.  The husband tried to tell me I should do this to save money.  I pointed out that much as it would make my life so much easier as a full-time working mother, it wouldn't work because of him.  He thought about that one for a while.   And agreed.  So the cycle has not been and will never be broken.  Just my cooking spirit.

So just why did he buy me Lorraine Pascale's Home Cooking Made Easy for Christmas?  Because there's nothing in there he will eat (well other than cake) so I doubt I'll ever use it as we never have dinner guests.  He said the other day that he was really proud of me keeping up this blog for so long and he actually read it and thought it to be not bad.  But I've shifted away from my original goal which was to try to get him to eat new food.  On that front, I've completely failed, although really I was doomed from the start.

Finished pie filling
When we've been out to restaurants, he'll eat stuff I wouldn't dare offer him at home.  He took me to the Ritz for our first wedding anniversary and he actually ate and enjoyed ballotine of duck.  He once at someone else's lamb curry (it was a friend of ours!) at a Thai restaurant.  But in his own castle, he is king.  And if he doesn't want to eat something, it's harder than trying to feed a toddler with pursed lips.

I thought he might at least eat the profiteroles (after everyone failing to keep the child out of the kitchen while I was cooking yesterday I figured that hot caramel for a croquembouche was a bad idea) but no, he doesn't even want those today.  He's just going to eat the leftovers from Christmas.  How eco-friendly of him so I can't denounce him for not trying something new, can I?

Anyway, the pie filling is made and I want to blog now while I still have some spare time and sanity - the child is out at the zoo with the grandparents.

In the end, I ditched the BBC Good Food recipe I was going to use in favour of one from the GBBO book.  This is a really lovely book with loads of recipes from the series plus practical guides on how to do things.  Not sure who cooked this on the Bake Off but it's a really nice recipe.  This from someone (me) who doesn't like beef much and especially not beef pie, but is willing to make a sacrifice at Christmas for other people who will (hopefully) enjoy it more (my family - if they've not stuffed themselves silly pre-dinner like they did yesterday).

Fills a 23cm pie dish


  • 750g lean stewing steak, cut into 2.5cm dice
  • 1 1/2 tbsp plain flour
  • 3 tbsp vegetable oil
  • 2 medium onions, finely chopped (I used whole shallots)
  • 2 garlic cloves, finely chopped
  • 350ml red wine
  • 250ml beef stock
  • large sprig of fresh thyme
  • 125g small button mushrooms
  • salt and black pepper
  1. Toss the beef in the flour, seasoned with a little salt and pepper, to coat thoroughly.  Heat the oil in a large, lidded frying pan.  Add the pieces of meat, a few at a time and fry for about 2 mins on each side or until nicely browned.  Remove with a slotted spoon to a plate.
  2. When all the meat has been browned, turn the heat right down and add the onions and garlic to the pot, stirring well to dislodge any bits stuck to the base.  Cover the pot and cook very gently, stirring occasionally, for about 12 minutes or until the onions are very soft and lightly golden.
  3. Meanwhile, simmer the red wine in a small pan until reduced by about one-third.  Pour into a measuring jug and make up to 500ml with beef stock.   Uncover the onions and stir in the wine and stock mixture followed by the beef (plus any juices on the plate) and the leaves from the sprig of thyme.   Bring to the boil, then lower the heat, cover the pot and cook gently for 1 hour, stirring from time to time.
  4. Add the mushrooms and stir well.  Simmer, uncovered for another hour or until the meat is tender and the gravy is very thick and coats the meat.  Taste and add mofe salt and pepper as needed.  Leave to cool then cover and chill until you are ready to fill the pie.
As served (pic taken after blog was posted originally)


I'm planning to serve this with puff pastry lids, new potatoes and fresh asparagus (I know it's not in season here!).  Pudding will now be leftover mince pies, birthday cake or Christmas pudding (in the spirit of thrift) and I may just put my toys back in the pram and not give up on this blog - I'll just give up on the idea of my husband ever trying something new.  Although if the husband reads this and doesn't forgive me, there may be no blog tomorrow as I may be homeless.  Watch this space...

Sunday 25 December 2011

Brussels Sprouts with Pancetta

Those of you who follow me on Twitter will know that I've been a bit bah-humbuggy in the run up to this Christmas.  I'm not sure why.  Maybe it's because I went back to work from maternity leave in March and so my body clock is screwed and I'm just not ready for Christmas - come March I'll probably come over all festive and be wanting another turkey dinner.

Add to that the fact that this is the first time I've hosted Christmas at my house and it's just been a whole other level of stress.  I love my mum, really I do.  But she likes to help in the kitchen and I don't like being helped by anyone unless they do-as-I-say.  This is rare as nobody listens to me.  Not the husband, or the child, or the dogs, or most other people.  It drives me potty when something is simmering and the husband appears and tells me that he's been stirring it 'because it was burning'.  My kitchen is quite small and so there's not really room for anyone else when you're trying to cook dinner for two, let alone six.

I also think Mum is feeling at a bit of a loose end as she's not got the turkey dinner ahead.  She's in charge of entertaining the child and keeping her out from under my feet (which in turn will hopefully keep mother out of the kitchen unless I have a crisis).

Of course I want to show off a little bit too and do things a bit differently rather than just plain roasties and plain carrots and plain sprouts.  The husband doesn't often pay compliments - especially about my cooking - but he always says he prefers my turkey to my mother's.  Result.

But of course, we have all the foibles still to deal with.  My Grandad doesn't like almonds, icing and marzipan or Christmas pudding so I've had to make special mince pies with a regular top for him (everyone else is getting the Thomasina Miers mince pies I tried a while back).  The husband will only eat Bisto instant gravy so I've had to borrow two gravy boats from my mum because everyone else is getting home made gravy whether they like it or not (but I got mum to bring Bisto as a back up just in case).

Pretty colours
Last year I made these amazing roast potatoes.  Radical.  Cooking the potatoes in fat and with the sausages and some garlic.  The hubby said they were the "best roast potatoes ever" and now I'm never allowed to cook them another way again.

So for this year's recipe I wanted to do something with the sprouts.  Pancetta and chestnuts seem to be the default recipe and I've been intending to road-test this for some weeks, but here we are at Christmas day and I'm just having to go with the flow.  What stopped me in my tracks was that I didn't realise everyone uses pre-cooked tinned chestnuts.  I rather blindly assumed I'd need real ones so there's a bagful sat in my fruit bowl looking a little folorn as I didn't know how to roast them and now I know, I can't be bothered.

Instead I made these.  Simplicity in itself.  Cooked in advance just in case they tasted horrible and will reheat later.  Word of advice - go careful on the stock as the pancetta makes the overall taste quite salty but it works well with the blandness of the sprouts (I have yet another cold so can't taste subtle flavours).

Wish I'd thought to roast the chestnuts yesterday to go with the mulled cider.  Far too much food around the house today for any more to be added to the mix, but will maybe give that ago tomorrow.

Thank you so much BBC Good Food, you really make my Christmas :o)

Have a fab time one and all xxxx

PS: If you're looking for something amazingly festive, you really should check out Mikes Baking and his Holiday Cauliflower.  I sooooo want to do this to my cauliflower but used up all the pancetta on the sprouts.  Wondering if it goes with Beef in Red Wine that I'm doing tomorrow....probably not....


100g cubed pancetta
750g Brussels sprouts , trimmed
400ml chicken stock
25g butter

Fry the pancetta in a large non-stick frying pan for 4-5 mins until crispy and golden, then add the Brussels sprouts and cook for a further min. Pour in the chicken stock and simmer for 15-20 mins until the sprouts are tender and the stock has reduced. Melt in the butter, season well and serve.


Saturday 24 December 2011

Incredible (!) Mulled Cider

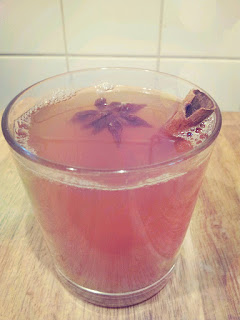
Firstly, I'd like to point out that I didn't deem this cider 'Incredible'.  That is what a certain Mr Oliver calls it.  It was nice in my book.  Probably the nicest mulled cider I've ever had.  But then I've never had mulled cider before so I don't have anything to compare it to.  I'd love to put my trust in him, however, I do have a small bone to pick with this recipe.
Pretty in pink -  my version

Take a look at the recipe on his website (I came across it in a free Christmas pull out in my mum's newspaper some weeks ago).  Look at the picture.  The cider looks a lovely golden colour.  Now look at my picture.  Okay, so although I do have my own pro photographer to hand (he was busy eyeing up the remains of the coconut ice and Nutella fudge, my photography skills aren't brilliant, but mine is a lovely pinky colour.

This is down to the pomegranate in the drink.  Pomegranates have gorgeous jewel-red seeds.  I swear that Mr Oliver's mulled wine has never been near a pomegranate.  I'm sure you can't get yellow ones.  So if the picture on his website (which was also in the pull out) is really of the cider then why is his not pink.  Something fishy going on here....  Maybe I should call the fraud squad or something...?

Anyway, it's a really good, winter warming recipe.  I'm not a drinker so this is quite high praise.  I really can't hold my alcohol.  The family joke that I only need to sniff a barmaid's apron and I'm drunk.  This is strange as my mother can pack away a bottle of wine like it's Evian.  The husband loves this as it means he's always got a designated driver on the rare occasions that we go out.

(c) Jamie Oliver - Golden Brown - Jamies version
I usually have a mulled wine if I'm out somewhere festive (again rare) but red wine always gives me a stonking headache so the idea of cider was much more appealing.  I do, every now and again, have a cheeky cider (although not real West Coun-ree Scrumpy as befits the roots on one side of my family).  I'm not a fan of cinnamon, liquorice (from the star anise) or cloves.  But together they are really harmonious and turn some pretty average supermarket Scrumpy into something quite special.

If you have time this winter, really do give it a try (especially you @HelsWatts :))

Jamie Oliver's 'Incredible' Mulled Cider - serves 15


• 2 litres good cider, such as Scrumpy
• 6 cloves
• 3 or 4 star anise
• ¼ nutmeg, finely grated into the pan
• 1 cinnamon stick
• 1 vanilla pod, halved
• juice of 1 orange
• juice of 2 clementines
• juice and seeds from 1 pomegranate
• 4 or 5 tablespoons of caster sugar, to taste


Pour all of the cider into a large pan on a low heat and warm it through for a few minutes. Add all of the spices and fruit juices and turn the heat up. Once boiling, turn down to a simmer and leave to tick away for 5 to 8 minutes. As everything infuses you'll get the most delicious layers of flavour. Just because this is a glorified Christmas punch doesn't mean you don't taste it like you would a sauce. Pay attention and add a few tablespoons of sugar to taste. You don't want it to be sweet; you just want the sugar to join up all the different spices so you get a harmonious taste.

When you are happy with the flavours, ladle the mulled cider into glasses or mugs and serve while warm and delicious. Personally I think it's nice to leave bits of spices floating around in the cider when you serve it but if you want yours clear and perfect just pour it into the glasses through a sieve.

Friday 23 December 2011

Soft Raspberry Coconut Ice and Lemon Christmas Biscuits

Now, when I cook during the day, I have a battle on my hands to try and not have a very cute and inquisitive small person help me out.  A while back, I thought it might be fun to make some gingerbread with her.  She's pretty smart (although I may be biased as her mother and because I don't know any other 21 month olds in person, she may be well behind) but she can crack an egg without getting shell into the bowl and she knows all of the kitchen equipment and that things need to go into the oven to bake (huge tantrum last time we made Rice Krispie cakes as mummy wouldn't cook them - they sat in a cold oven for half an hour in the end, just to keep the peace).

My little helper on another occasion
This now means that if I so much as pick up a spoon, she immediately demands 'Abbeeeeee help' or 'Abbeeeeee's turn' and has a right old strop if I have to say no (she still doesn't get the concept of hot pans).  I'd decided weeks ago that we'd make Christmas biscuits today ready for the arrival of my mother and the rest of the family tomorrow.  But yesterday, I came to rue that decision...

If you read yesterday's blog, you will know that we went to visit my Father-in-Law on the Isle of Wight.  When I wrote the blog, I hinted that the visit is more than a little stressful.  But inquisitive toddler-child took things to a whole new level of stress.

Before I continue, I'd just like to point out that I'm a good mother and I'm hoping that all mothers of toddlers have experienced similar near disaster.  Please don't go ringing social services after reading this.  Things happen when toddlers are let loose in strange places.

I often wonder about the confessional nature of this blog and if I'll ever get myself into trouble.  Should I just button it and talk about the food?  I find the waffley bit at the start somewhat cathartic to write, but if I EVER start to sound like Liz Jones of the Daily Fail, please, someone tell me and I'll just talk about food!
Pre-bake biscuits
Back to yesterday's near disaster.  Abigail has a fascination with knobs and buttons.  Again my fault as I let her turn on the washing machine.  Which means I often used to suddenly hear our dishwasher spring to life by itself (before it blew up the other day) and I have to watch my oven like a hawk when it's on as she likes to change the temperature.

So we're at the F-I-L's house.  He has an electric oven and stove with a million knobs on the front.  He unpacked his hamper goodies on top of said oven.  A while later, I said I thought I could smell burning.  Someone who shall remain nameless, had obviously turned one of the hob rings on and set fire to the packet of biscuits for cheese.

I'm just grateful that we'd not decided to go out and play in the garden or he may not have had a house to come back to!  The husband had warned him that this might happen and unpacking the hamper there was a daft idea.  As we only see F-I-L twice a year, I really don't think he was prepared for the whirling dervish that is our daughter and it'll probably take those six months for him to recuperate from the stress of our visit.

Abigail's finished biscuits - decorated all by herself
So this morning, I was a little reticent at letting Abigail near anything that might cause further disaster. But then I felt a bit bad so we made both Christmas biscuits and Soft Raspberry Coconut Ice.  She made the biscuit mixture herself, I rolled, she cut, I baked, she decorated.  Then we started on the coconut ice, but sadly, Mr Tumble is far more fun than mummy faffing about trying to figure out 3/4 of the recipe quantities as we didn't have enough coconut.  

And this is the bit where I finally talk about the recipes!

I chose the biscuit recipe after scouring practically every baking book I own for a Christmas biscuit recipe that didn't involve ginger, oranges or boiled sweets.  Fussy mother who doesn't like ginger, fussy me who's not a fan of orangey things (except Jaffa cakes although I wish they still did the lemon and lime ones) and couldn't face the idea of the mess I might make with the boiled sweets.  

I found the recipe in The Great Big Cookie Book.  It's one of those books I picked up for a fiver in a cheap bookshop and thought "This will be really useful and I'll use it all the time"  I bought it in 2003 when I bought my first house and this is the first time I've used it.

The biscuits are very shortbready although crunchier due to the thinness of the roll (3mm).  I went for all out lemon flavour with lemon icing but in all honesty they really don't taste that festive.  Far more summery if you ask me.  But nice.  And so beautifully decorated by my gorgeous girl.  The only thing that disappointed me was a) they lost their shape a bit when cooking and b) the recommended glaze had raw egg white in which I obviously can't use with a 21 month old so I just used good old lemon glace icing.

Christmas Biscuits
  • 175g unsalted butter
  • 300g caster sugar
  • 1 egg
  • 1 egg yolk
  • 1tsp vanilla essence (I used lemon essence)
  • grated rind of 1 lemon
  • pinch of salt
  • 300g plain flour
  • 125g icing sugar
  • juice of half a lemon

  1. With an electric mixer, cream the butter until soft.  Add the sugar gradually and continue beating until light and fluffy.
  2. Using a wooden spoon, slowly mix in the whole egg and the egg yolk.  And the vanilla essence, lemon rind and salt.  Stir to mix well.
  3. Sift the flour over the mixture and stir to blend.  Gather the dough into a ball, wrap and chill for 30 minutes.
  4. Preheat the oven to 190c/375F/Gas 5.  On a floured surface, roll out until about 3mm thick.
  5. Stamp out shapes or rounds with flowered cookie cutters.
  6. Bake for about eight minutes until lightly coloured.  Transfer to awire rack and leave to cool completely before decorating.
  7. Mix the icing sugar and lemon juice to a consistency that coats the back of a spoon.  Use to coat the biscuits and then decorate with sweets.
From The Great Big Cookie Book by Hilaire Walden
Pretty pink coconut ice
I picked out Dan Lepard's coconut ice the other day as it's one of the first things I ever remember cooking with my mum.  We used to make all kinds of sweets when I was little as she was forever manning stalls at fetes and fayres as Brown Owl or to help out at my school.

Back then we used condensed milk and icing sugar - she showed me the recipe book the other day but I can't remember for the life of me what it's called.  Dan's recipe, however uses marscapone and fresh raspberries.  

I had a little tub of pureed raspberries from my garden in the freezer so they worked really well as they had far more taste than shop-bought ones have at this time of year.  It lends a really fresh taste to the coconut ice.  You don't really notice it at first but as the tooth-tingling sweetness disappears, suddenly you're left with the taste of summer dancing on your tongue.  

Coconut ice
It's also very soft.  I remember the coconut ice my mum used to make could often feel like you were going to crack a tooth when you bit into it.  But this is like diving into a Bounty bar.  Beautiful.  

Sadly it doesn't say how long it keeps, but judging by the flavour, I figure this is immaterial as nobody will leave it hanging round long enough to find out when it's past it's best.  As always, highly recommended and will be a great gift for the visitors over Christmas. 

I also didn't have quite enough coconut and my tin was slightly too big for the original recipe, but I was saved (once again) by Lakeland's amazing foil lined parchment.  Honestly, this is brilliant stuff and every baker should own some.  It allowed me to fashion a container within my tin to just over half the size of the tin and happily retained its shape once the coconut ice was pressed in without the divider falling flat and the contents tipping everywhere.


Soft Raspberry Coconut Ice

For the white mixture
  • 250g icing sugar
  • 100g marscapone
  • 150g desiccated coconut

For the raspberry mixture
  • 50g fresh raspberries
  • 50g marscapone
  • 250g icing sugar
  • 200g desiccated coconut
  1. Line an 18cm sqaure tin with non-stick baking paper.  
  2. Make the white ice first by beating half the sugar with the marscapone until you have a smooth runny paste.  Stir in the coconut and remaining sugar, mix well then press into the bottom of the tin.  
  3. Pack the mixture well and smooth the top.
  4. Squish the raspberries with the marscapone and half the sugar until smooth.  Then stir in the coconut followed by the last of the sugar.  Spread this carefully  over the white ice until you have it even, then press it down firmly with a spatula and your figers.
  5. Loosely cover the tin, with the top of the ice exposed to the air slightly, and leave overnight somewhere cool to firm.  The following day, lift out of the tin by lining paper and cut into pieces.

From Short and Sweet by Dan Lepard

Thursday 22 December 2011

The Best Ever Cookies - courtesy of @BakingElements


When I first met the husband, he hadn't seen his parents for 10 years.  For someone who was still living close to home, and didn't go for more than a week without seeing family, I found this hard to comprehend.  Now, I understand.

Cookie Jenga
See his father lives on the Isle of Wight (his mother passed away not long after I met him).  It's not that far away.  And yet it's a pain in the backside to get to.  And expensive too.  It's just a stones-throw from where my family live.  But it takes nearly twice as long to get to because of a tiny stretch of water called the Solent.  You have to get a ferry.  Yes you can rock up and buy a ticket on the day.  But it takes a lot more planning.  The husband isn't the sort to just pop in.  And with the hassle of two dogs and a toddler on a ferry, it's not the kind of journey we'd want to undertake too often.  Knowing my husband as I do, I understand why he didn't go for ten years (too much hassle for someone who will only make an effort when it's in his own best interests) but if it was my family, I'd make the effort more often.

We never stay over either.  If you've lived on the Island - which my husband has - you appreciate the fact that it is a tourist hell-hole in the summer and bleak and soulless in the winter.  Mid-summer, you'll pay more to get the ferry to the Island than you would for a flight to the States  - okay a slight exaggeration, but mile-for-mileit's the most expensive piece of water to cross in the world.  And holiday rentals, especially ones that allow children and dogs are just plain astronomical. It would be cheaper to go to Sandals for two weeks and put the dogs and child in the Doggery (just kidding before you think of calling Social Services!)

How much chocolate??
My trauma is compounded by the fact that I also have to provide my own catering.  Our dogs are too "inquisitive" to sit patiently under the table in a pub whilst we eat.  So I have to take a picnic.  The husband always eats three times as much on these days as he normally would.  He's cracked into the box of home-made sausage rolls before we've even got to the A303.  And now with a hyper-fussy toddler to feed too, I'd just rather stick my head under the pillow and plan my Christmas dinner (which I've still not even thought about yet).

Add to this the fact that I had to fit in a run this morning and a new recipe for the challenge, my usually low blood pressure has been slightly raised somewhat today.  

Pre-bake
Which is why I was up at 4.30am baking.  Yep.  Baking fresh cookies to go in the F-I-L's Christmas hamper.  The husband wanted to know why.  Because I have a thing about making things from scratch at the moment.  Despite my F-I-L being like my husband and eating to live rather than living to eat, I still feel this compulsion to at least put some homemade goodies in the hamper.  I swear when I proffer a box of homemade cake, he's thinking "Why didn't she just go to Morrisons and get me some Value Jam Tarts?"  Because that's exactly what my husband would say.


But it makes me feel better about myself that I've actually made some effort with his present rather than just running round the supermarket pulling boxes from shelves.  In amongst all the Christmas staples from various shops (mince pies, Christmas pudding, cheeses, pickled onions, savoury biscuits, Quality Street) there was some Nutella and SeaSalt fudge, Cherry and Pistachio cookies dipped in white chocolate, Sadia's Triple Choc cookies (today's recipe) and Chocolate Mint Truffles.  All recipes from this blog over the last month or so.

Today's recipe made THE BEST COOKIES I'VE EVER TASTED.  Seriously.  It comes from the Baking Elements blog, written by the lovely Sadia whom I met on Twitter (@bakingelements). She's a fab tweep to tweet (autocorrect just changed that to twerp - good job I noticed!!) and a splendid baker and blogger too.

Close Up
You have to hop over to her blog to find out more about the history of cookies and the recipe for them.  I don't think I'll ever use another choc chip cookie recipe again.


Only thing I did differently was to be totally lazy and use Waitrose Cooks Ingredients Chocolate Chunks rather than chopping up my own chocolate.  Purely because sharp knives at 4.30am in the morning can only lead to a minor disaster.

Am now thinking of trying these with a combination of Green and Black's dark chocolate and butterscotch chocolate next time I'm in a cookie-baking kind of mood.

Sadia, I can't praise them highly enough!  The one I ate was THE BEST BREAKFAST EVER.  As for what the F-I-L thinks?  Well by the next time the husband speaks to him (around June for other six-monthly visit) they will be a distant memory. 

Wednesday 21 December 2011

Danish Pastry


Today's blog has been partially pre-recorded.  There are two reasons for this.  One it's my birthday and I'm hoping that the husband is going to take me somewhere lovely and special (although judging by the pouring rain hammering on the Velux window as I write this first part, I have a feeling we're going to be stuck home all day).  And two, the recipe I'm trying takes two days to make.  Yep.  Two days.  But was it worth the effort?

As I've mentioned before, this blog was inspired by my lovely cousin Laura, @BridestockBride.  She tweeted me during GBBO and asked if I'd ever made my own Danish pastries.  The answer was no.  But I'd love to give it a go.

So today and tomorrow (or yesterday and today, or the 20th and 21st December 2011 depending on when you're reading this) I'm trying out Joanne Wheatley of GBBO fame's Danish pastry recipe.

Now there's no two ways about this.  Proper Danish pastry or French croissant dough is a faff.  Like puff pastry, there's lots of rolling and folding and resting and rolling and folding and resting.  This recipe requires four lots of the above at hour-intervals.  So not something I'll be doing every day.  Or probably again any time soon.  Unless there's a particularly special occasion, I'll just pass if it's all the same.  

It's too labour intensive for a full time working mother of a toddler who struggles to deal with the constantly full laundry basket (I struggle to deal with the laundry basket and the toddler - I'm not using her for slave labour just yet).   So the idea that I might have time for the frivolity of making my own Danish on a regular basis is just a pipe dream.  And if I won enough money on the lottery to give up work, I'd just move to France where someone else could make said patisserie for me.  

Back to my birthday.  I'm not high maintenance.  Far from it.  In fact, most of the guys I know wish they could have a spouse/girlfriend who is as undemanding as I am (my husband would not agree with the preceding statement in public).  Take yesterday's lunchtime conversation.  I am the only woman in a team of 20.  Topic for the day 'What are you buying your other half for Christmas?'  After listening to endless tales of the luxuries required by my colleagues wives, I was asked what I wanted for Christmas.  "Oh nothing" came my reply.  When pushed "well I'm hoping to get a sugar thermometer.  I'd like some time to myself to go running.  I'd like to not have to cook three separate meals every evening."  No shoes, no handbags, no perfume or expensive trips to New York.  If they were offered, of course I wouldn't say no.  But I'm not one to ask for them.

When we lived in London, one birthday we had a private flight on the London Eye and Tea at the Ritz.  I didn't ask for it.  I never would.  I loved the surprise.  If it was offered again, I'd love it just as much.  But to me, the perfect day would be breakfast in bed and then a trip out with my little family with no tantrums (from either the toddler or the husband).

Every year, the husband asks what I want to do on my birthday.  Every year it's the same reply.  Breakfast in bed - croissants or pain au chocolat, fresh juice and coffee.  Every year he nips off to Sainsburys at 9pm only to find that they've not restocked the shelves yet and returns empty-handed.  I wouldn't even consider suggesting buying bake your own croissants from a can that you can sometimes get in the chilled section of the supermarket.  And with Greggs being the only bakers in town, nearly-French patisserie isn't really an option.

So this year, I decided to have a go at making my own pastry.  With a day off work and Miss A at nursery (another wish - not to be judged by my friends who are lucky enough to have family who take their kids off their hands for sending Miss A to nursery once in a while when I have a day off so I can catch up on housework) I had some time in between cleaning ready for Christmas to give this recipe a whirl.

I found the pastry really difficult to work with.  I'm rubbish at rolling pastry out evenly at the best of times (I can turn a shop bought, perfectly oblong block of pastry into a weirdly shaped polygon in no time) but this pastry was a whole other level of strange to work with.  It was like trying to roll bread dough out.  Except the lumps of butter made it hard to even attempt to roll evenly and every time I rolled it one way, it just contracted itself back to half the size.

Then when I put it in the fridge - a step that is supposed to slow the yeast growth - it just took on a life of its own and multiplied its width three times.  I'm was thinking that maybe my fridge was too cold as the butter seemed so solid and I would have expected it to need a slightly warmer butter consistency as it didn't spread evenly through the pastry - it just hung around in nasty lumps.  But then if I'd left the dough in a warmer climate, it may well have turned into a behemoth given its propensity to grow in my cold fridge.

Anyhow, it's now resting overnight so that I can bake my own pastries first thing in the morning.  What's the betting that tomorrow, the husband will proudly present me with some croissants he procured at Sainsburys last weekend?

Here endeth part one.

Day Two

Well this is definitely one recipe I'm going to need to work on.  I think I need a better understanding of the science behind the bake before I attempt it again.  I'm not sure quite what went wrong because despite worrying my pastry had lumpy butter, it looked a lot like Jo's pictures in her blog, but when baked it didn't work.

Mmmm...chocolat
I hopped out of bed this morning and made four pain au chocolat for the husband to bake.  Instructing him to cook them for twenty-five minutes, he did so to the second and they were singed beyond recognition.  Just can't get to grips with my oven.  Some bakes take ages and on this ocassion, they obviously needed a lot less time.

Just baked one now whilst putting together some goodies for F-I-L's christmas hamper (more on that tomorrow) and it took 30 minutes to cook, it was dripping in butter and the result tasted very buttery but had a bready texture, rather than the crisply-soft pastry that a true French pain au chocolat would have.  All my mistakes, I'm sure - especially as these helped Jo to win the Great British Bake Off in 2011!


I will be trying them again and may also give this recipe a go where they use softened butter spread straight on to the pastry rather than a chilled sheet. http://mymorningchocolate.com/2010/04/09/how-to-make-pain-au-chocolat-photos/ 
Related Posts Plugin for WordPress, Blogger...